Overview
The build template function allows you to design the form with different type of control field, configure workflow such as who should be involved in the process (e.g. action taker, approver or acknowledger) and how process will be routed for action.
Create a new template
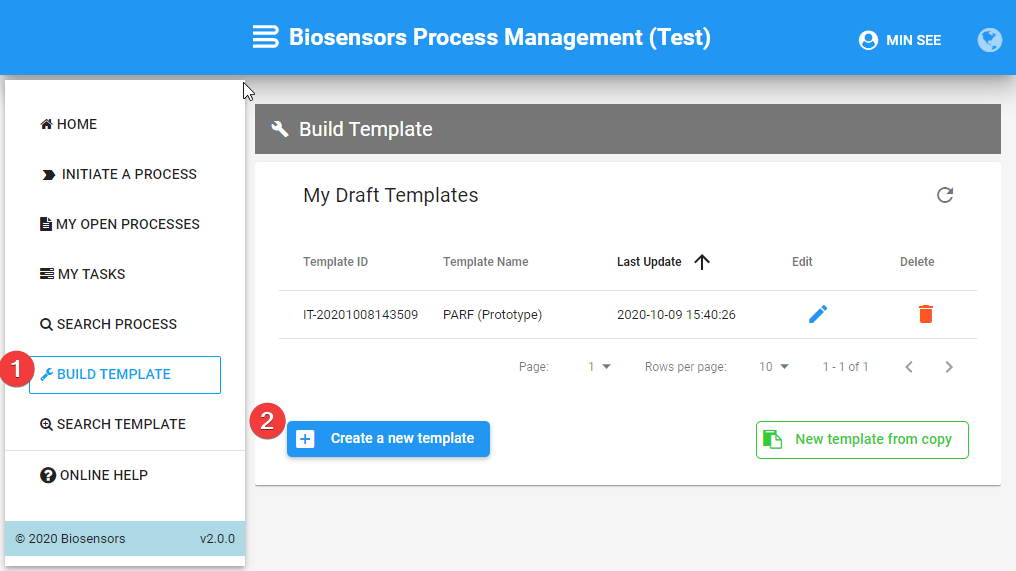
- Click on "BUILD TEMPLATE" menu link.
- Click on "Create a new template" button.
- Note : The "New template from copy" button at bottom-right is typically used to migrate template from test environment to live environment . Do contact IT for assistance about the usage.
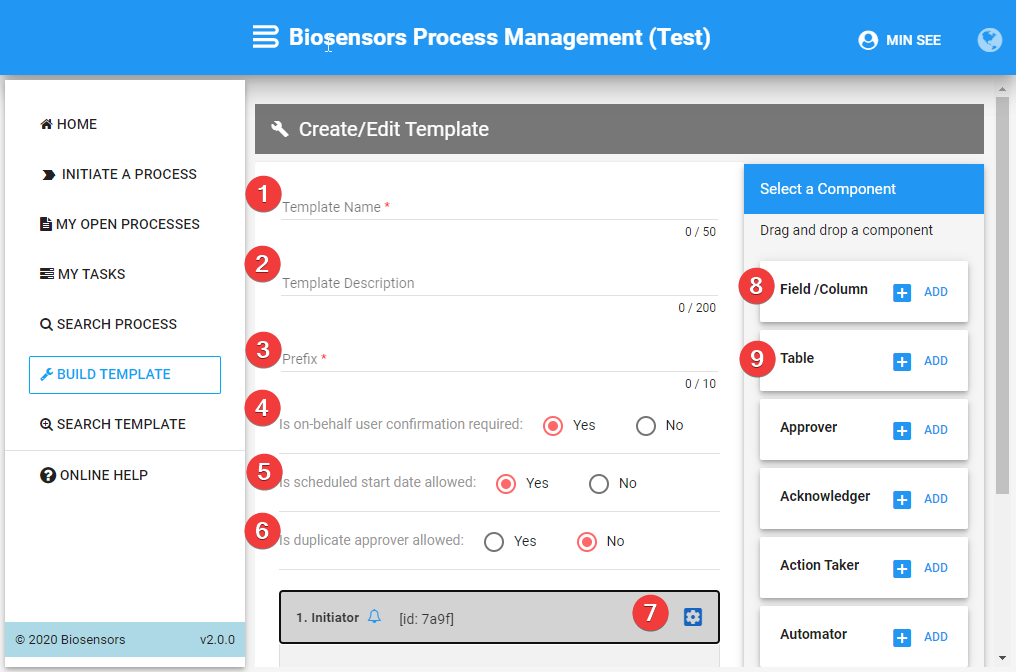
- Enter "Template Name".
- Please refer WI-11719 for the standard naming convention.
- Enter "Template Description".
- This is useful for requestor to know what the process template is for while initiating the process.
- Enter "Prefix".
- This will be prefix in process ID for all processes submitted under this template.
- It must be unique and not used by other process template.
- Indicate if on-behalf user confirmation is required.
- If yes, system will route to on-behalf person for confirmation if process is raised on behalf of them by someone else.
- Indicate if scheduled start date is allowed.
- If yes, system will allow initiator to indicate process start date during process submission.
- The submitted process will start route for action only on the scheduled start date.
- Indicate if duplicate approver is allowed.
- If no, system bypass and routed for approval only once. (e.g. if xxx template is configured to route to direct manager and HOD for approval. If direct manager and HOD are the same person, system bypass direct manager and only route to HOD for approval.)
- Click on "Initiator" Section to start design your form.
- Note : Form can be designed in other user steps as well such as approver, action taker and etc.
- Click on "+ ADD" button on field/column component to add field control.
- Upon click, field control will be added under "Initiator" Section for configuration.
- Refer "Configure field" section for more details on the configuration.
- Click on "+ ADD" button on table component to add table control.
- Upon click, table control will be added under "Initiator" Section for configuration.
- Refer "Configure table" section for more details on the configuration.
Configure field
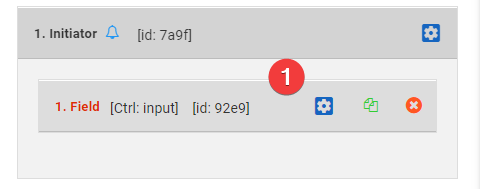
- On the newly added field, click on "Configuration" icon to start configure input field.
- You could remove the field by click on "X" icon.
- You could change the field's position with other fields through drag and drop.
- You could clone the field as new field for usage through the copy icon next to the "Configuration" icon.
- Please find below section for the configuration for different control type.
Input Control Type : Text / Textarea / URL / Email / Number
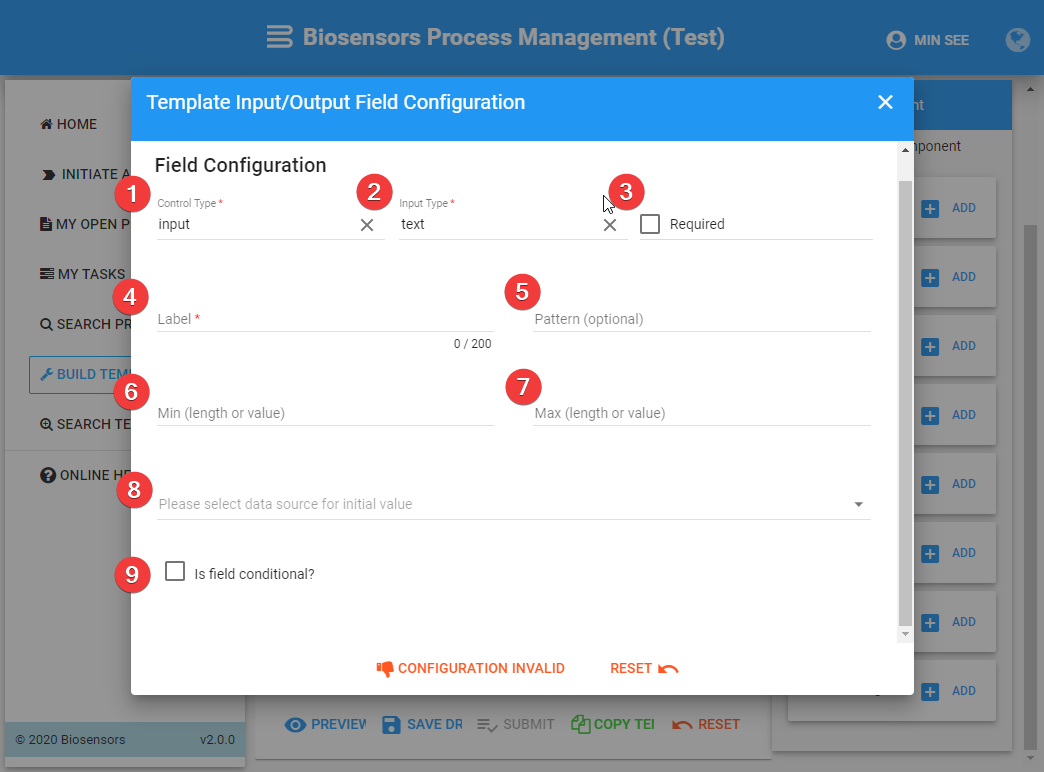
- Select "Control Type" as Input.
- Select "Input Type" as Text / Textarea / URL / Email / Number.
- Check if the field is mandatory.
- Enter "Label" of the field.
- Enter "Pattern" of the field (optional).
- Not applicable to "Number" input type.
- The data entered by initiator must matched the defined pattern. Else, error message will be shown.
- Please seek IT for assistance if pattern is required.
- Enter "Min (length or field)" (optional).
- Enter "Max (length or field)" (optional) .
- Select data source for initial value.
- This is an advanced function used to populate value using data from other system.
- Please seek IT assistance for configuration if required.
- Check if the field is conditional.
- Field is displayed only when the defined criteria is matched.
- Refer "Configure field conditional rules" section for more details.
Input Control Type : Select / Radio / Checkbox / Multi-Select
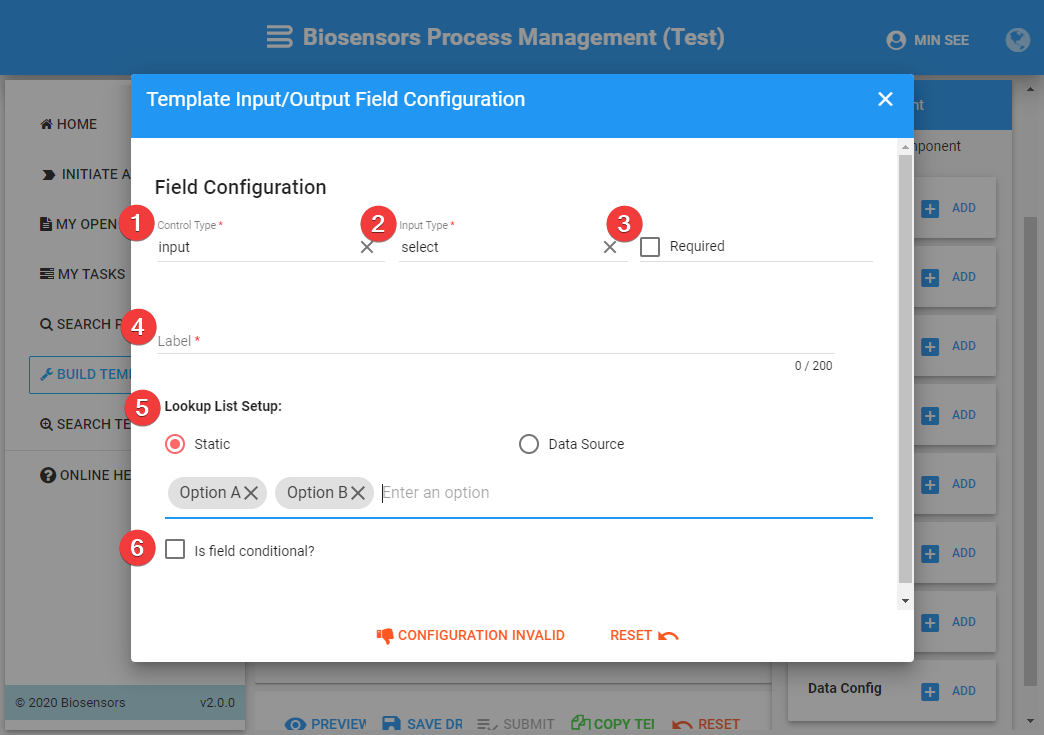
- Select "Control Type" as Input.
- Select "Input Type" as Select / Radio / Checkbox / Multi-Select.
- Check if the field is mandatory.
- Enter "Label" of the field.
- Configure Lookup List Setup.
- Static- Configure by enter static list value.
- Data Source- Using predefined data source from other system (Please seek IT assistance for configuration if required).
- Check if the field is conditional.
- Field is displayed only when the defined criteria is matched.
- Refer "Configure field conditional rules" section for more details.
Input Control Type : User Info
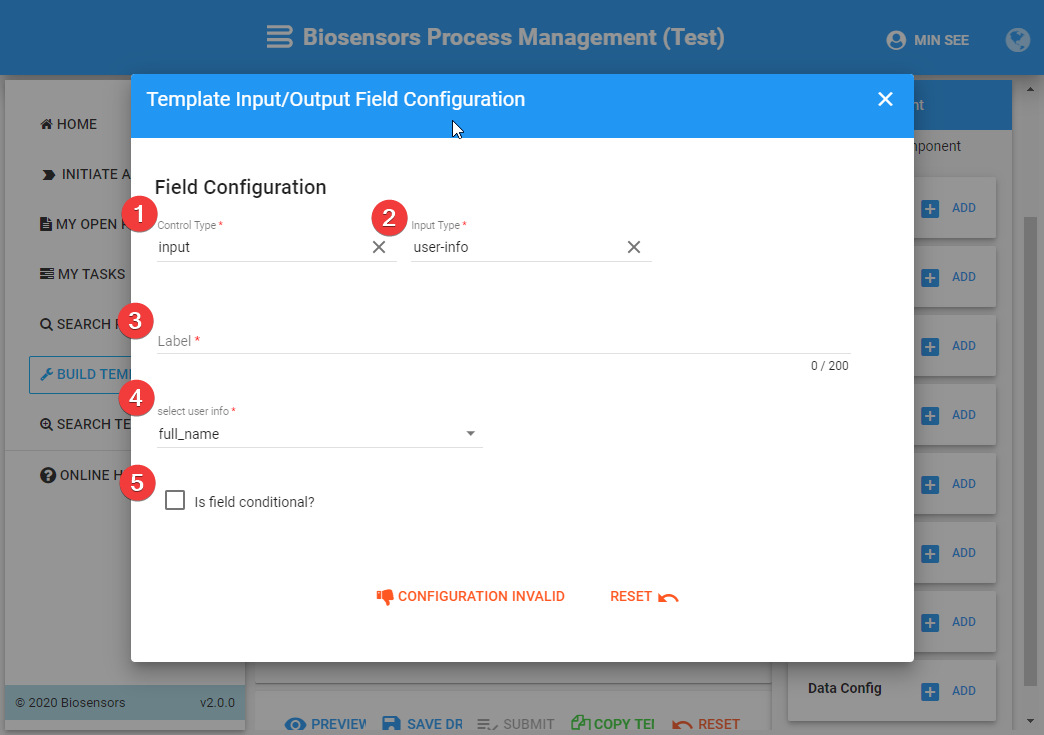
- Select "Control Type" as Input.
- Select "Input Type" as User Info.
- Enter "Label" of the field.
- Select user info to display.
- You may select requestor's profile info from HR system such as first name, last name, job title , cost center for display.
- Check if the field is conditional.
- Field is displayed only when the defined criteria is matched.
- Refer "Configure field conditional rules" section for more details.
Input Control Type : Editable-html
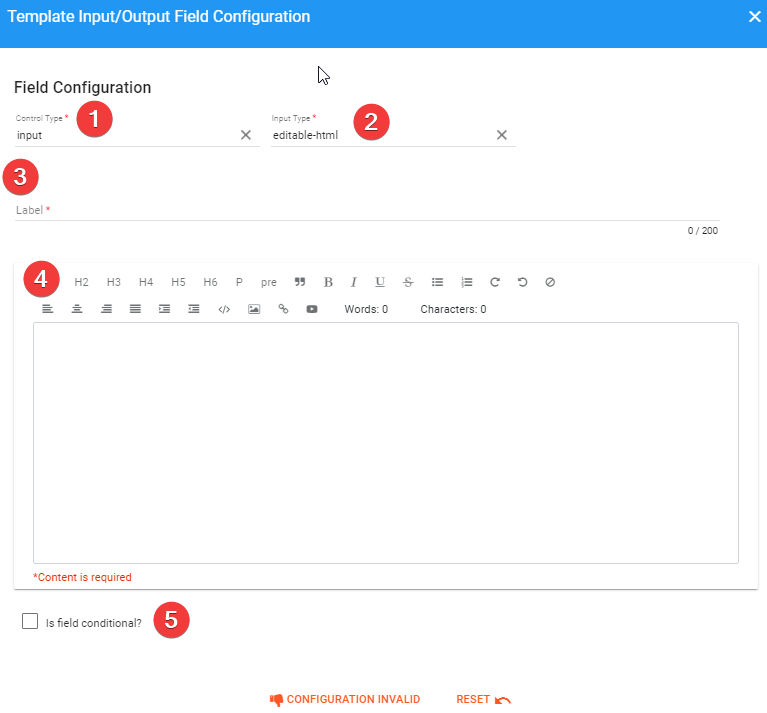
- Select "Control Type" as Input.
- Select "Input Type" as editable-html.
- Enter "Label" of the field.
- Enter content in html editor.
- Content will be displayed in editable html
- Check if the field is conditional.
- Field is displayed only when the defined criteria is matched.
- Refer "Configure field conditional rules" section for more details.
Input Control Type : e-sign
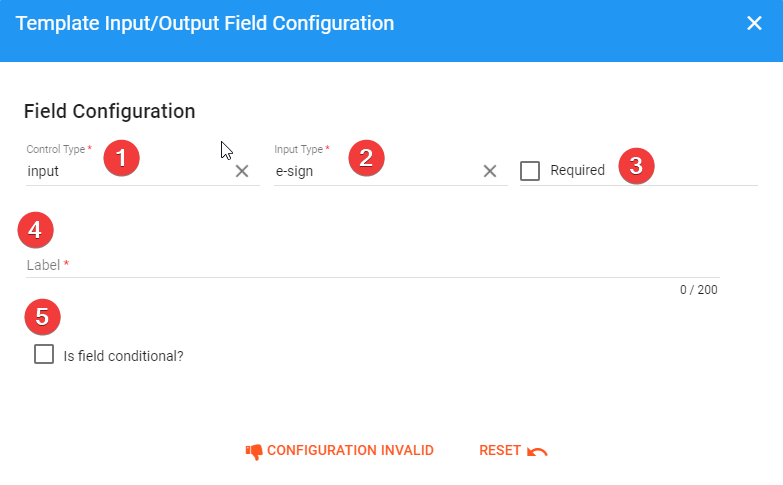
- Select "Control Type" as Input.
- Select "Input Type" as e-sign.
- Check if the field is mandatory.
- Enter "Label" of the field.
- Check if the field is conditional.
- Field is displayed only when the defined criteria is matched.
- Refer "Configure field conditional rules" section for more details.
Output Control Type : static-html
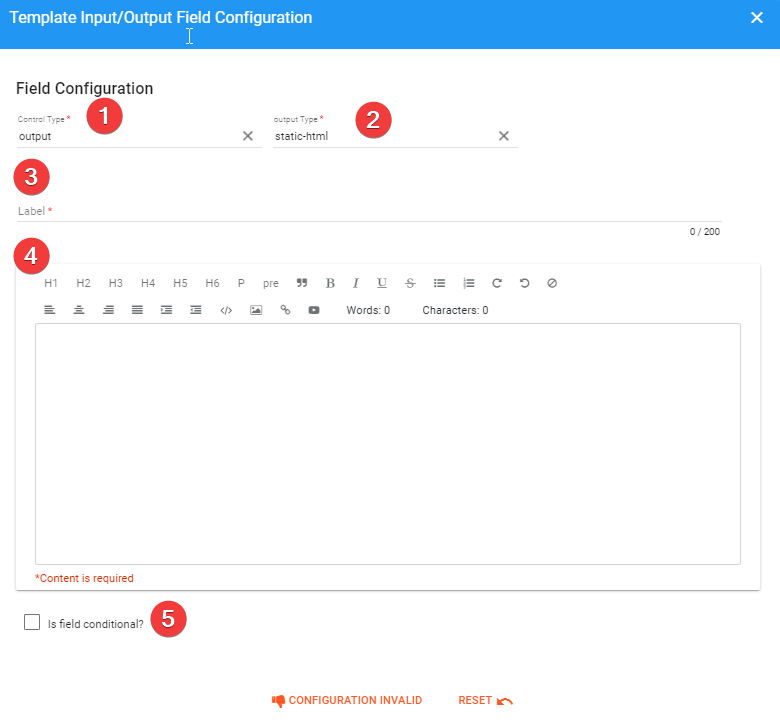
- Select "Control Type" as Output.
- Select "output Type" as static-html.
- Enter "Label" of the field.
- Enter content in html editor.
- Content will be displayed as read only html. This control is useful for static info like instruction and guideline.
- Check if the field is conditional.
- Field is displayed only when the defined criteria is matched.
- Refer "Configure field conditional rules" section for more details.
Output Control Type : text / date
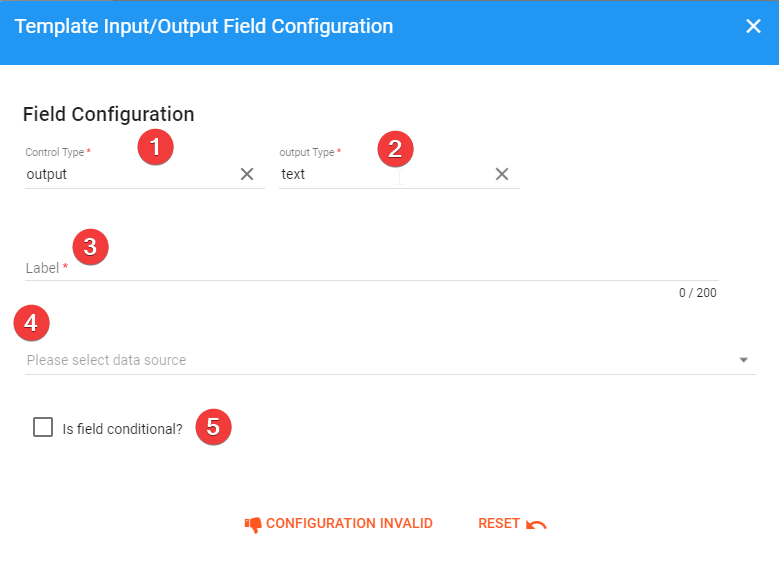
- Select "Control Type" as Output.
- Select "output Type" as text / date.
- Enter "Label" of the field.
- Select data source for initial value.
- This is an advanced function used to populate value using data from other system.
- Please seek IT assistance for configuration if required.
- Check if the field is conditional.
- Field is displayed only when the defined criteria is matched.
- Refer "Configure field conditional rules" section for more details.
Configure field conditional rules
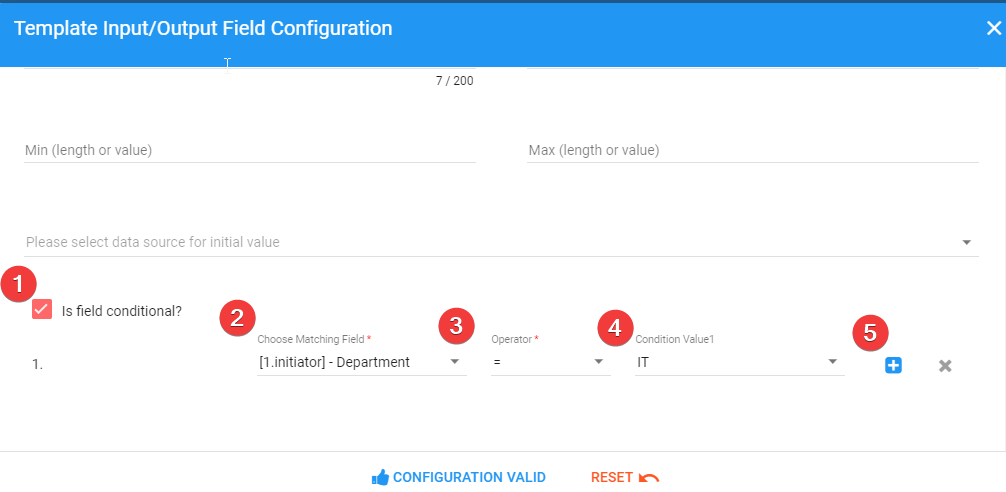
- To enable conditional rules, check on the "Is field conditional?" checkbox and follow below steps for configuration.
- All control types support conditional rules.
- Select "Choose Matching Field".
- You may use any field in form that you defined in this template as matching field.
- Choose "Operator". (e.g.= equal, no value, value exits and etc.)
- Choose/Enter "Condition Value".
- Field will be shown to user when the defined condition and value matched.
- Click "+" icon to add more condition (if needed).
Configure table
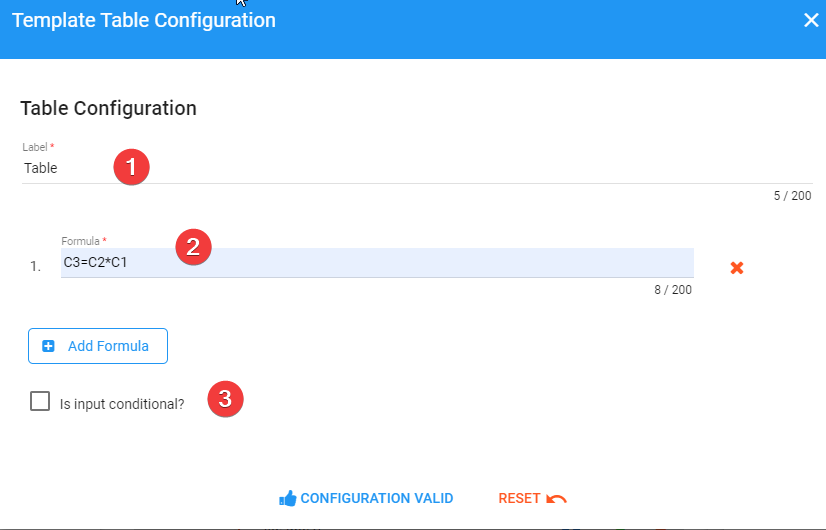
- Enter "Label" for table
- Define formula (optional)
- Formula can be used when column requires some calculation (for illustration : if we have column no. 3 (Total Price) which is derived from column no. 1 (Qty) x column no. 2 (Price) . For such case, the formula can be defined as C3=C1*C2 and total price will be auto calculated without user input).
- To remove existing formula, click on "X" icon on the right side.
- To add new formula, click on "Add Formula" button.
- Check if the table is conditional.
- Table is displayed only when the defined criteria is matched.
- Refer "Configure field conditional rules" section for more details.
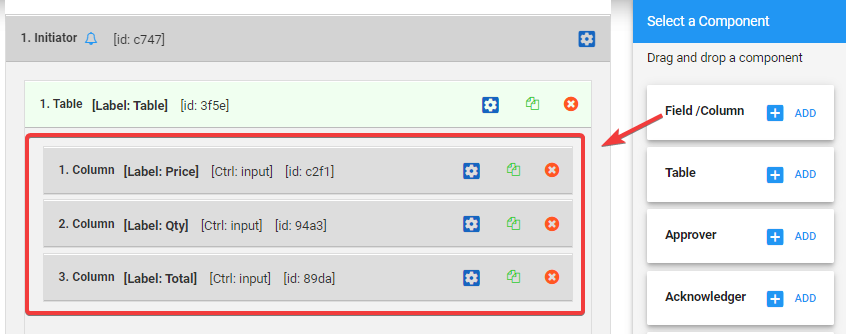
- Once defined table setting, you can add column to the table from the column component on the right-hand side — see below screen :
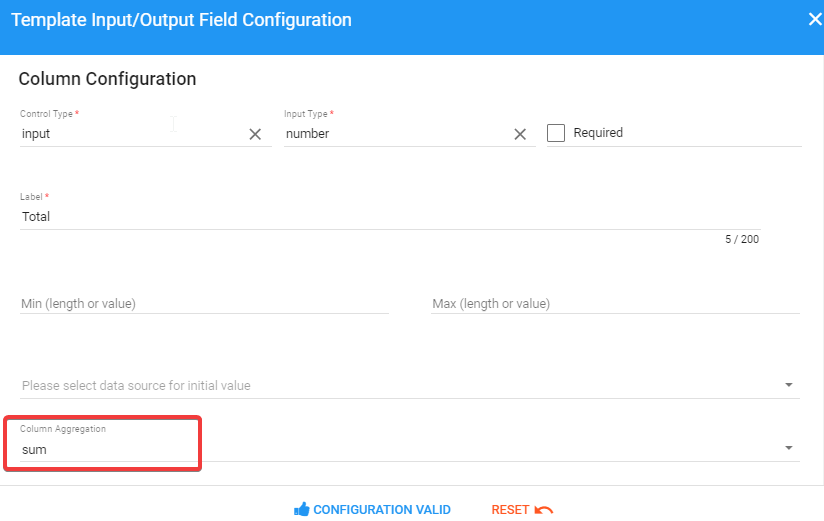
- The column configuration is same as field configuration but with additional setting for aggregation such as count, sum (for number input type only) and average (for number input type only) - see below screen for configuration and table display shown to end-users :
 Display of table

Configure workflow
- Approver : Can approve, reject or send process back for rework.
- Action taker : Can complete process or send process back for rework.
- Acknowledger : Be notified only. No action required.
- User group : Multiple approver/action taker can be added in the user group with setting either all require to take action or anyone from the group to take action.
- User under the same group will receive task simultaneously.
- Automator : predefined automated process without human intervention (e.g. integration with other system for data exchange).
- Please seek IT assistance for configuration if required.
Below are the steps on how to add and configure steps into workflow.
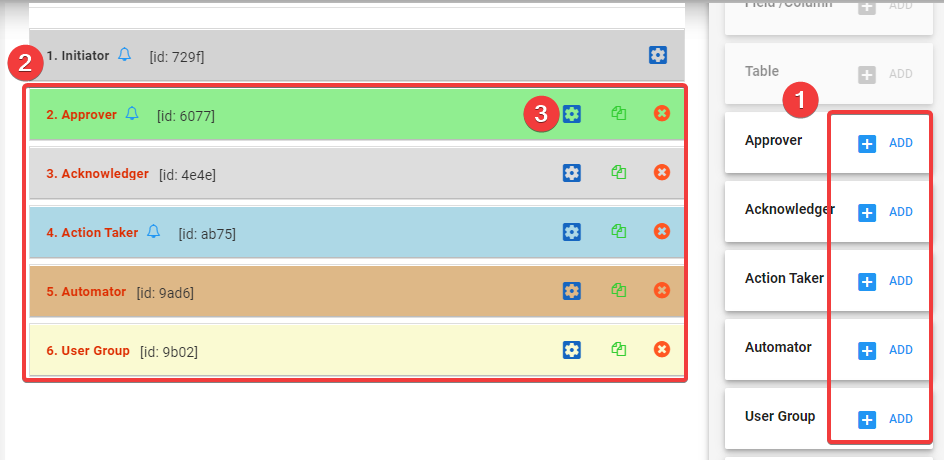
- Click on "ADD +" button on approver / acknowledger / action Taker / automator / user group from component panel.
- New section will be added automatically into configuration page.
- You could delete the section by clicking on the "X" icon.
- You could arrange the process sequence simply by drag and drop the section.
- You could add additional input field(s) by clicking on "Add" Field icon in panel.
- You could also clone the section via the "copy" icon.
- For each added section, click on the "Configuration" icon to define role who requires to take action.
Appover configuration
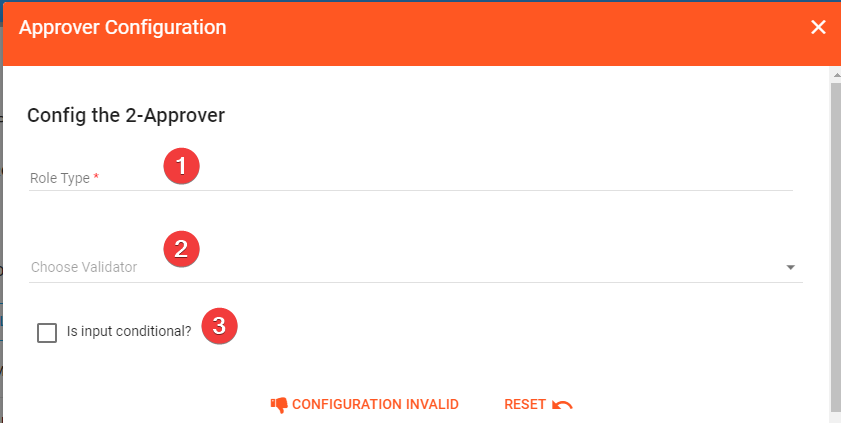
- Select "Role Type".
- Anyone in Biosensors
- This allows initiator to select own approver from user listing during process initiation.
- Specific Role
- Process will be routed to specific role configured at company,function,department and job title level for action.
- The role can be setup as :
- Company only
- Company + function only
- Company + function + department only
- Company + function + department + job title
- If there is more than one person found for the defined role , system will display the user list for selection (e.g. if role is setup as company only, list of users under the company will be shown for selection)
- Same User As
- Process will be routed to person same as in other user steps (user to specify).
- Requestor
- Requestor is either initiator or on-behalf user.
- Process will be routed to requestor.
- Direct Manager Of
- Process will be routed to direct manager of the user in other user steps (user to specify).
- Function Manager of
- Process will be routed to function manager of the user in other user steps (user to specify).
- Function Head of
- Process will be routed to function head of the user in other user steps (user to specify).
- Function VP of
- Process will be routed to VP of the user in other user steps (user to specify).
- CFO
- Process will be routed to Company CFO.
- CEO
- Process will be routed to Company CEO.
- Choose Validator
- This allows system to perform additional validation upon action done by user (e.g. check if mandatory data is provided and etc).
- Please seek IT assistance for configuration if required.
- Check if approver is conditional
- Approver is routed for action only when the defined criteria is matched.
- The configuration is similar as field conditional rules. Refer "Configure field conditional rules" for details.
Action taker configuration
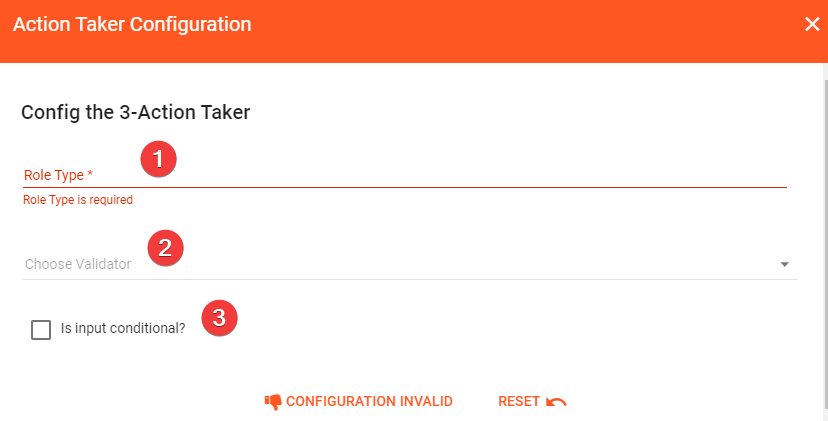
- Select "Role Type"
- Anyone in Biosensors
- This allows initiator to select own approver from user listing during process initiation.
- Specific role
- Process will be routed to specific role configured at Company, function, department and job title level for action.
- The role can be setup as :
- Company only
- Company + function only
- Company + function + department only
- Company + function + department + job title
- If there is more than one person found for the defined role , system will display the user list for selection (e.g. if role is setup as company only, list of users under the company will be shown for selection)
- Same User As
- Process will be routed to person same as in other user steps (user to specify).
- Requestor
- Requestor is either initiator or on-behalf user.
- Process will be routed to requestor.
- Choose Validator
- This allows system to perform additional validation upon action done by user (e.g. check if mandatory data is provided and etc).
- Please seek IT assistance for configuration if required.
- Check if the Action Taker is conditional.
- Action Taker is routed for action only when the defined criteria is matched.
- The configuration is similar as field conditional rules. Refer "Configure field conditional rules" for details.
Acknowledger configuration
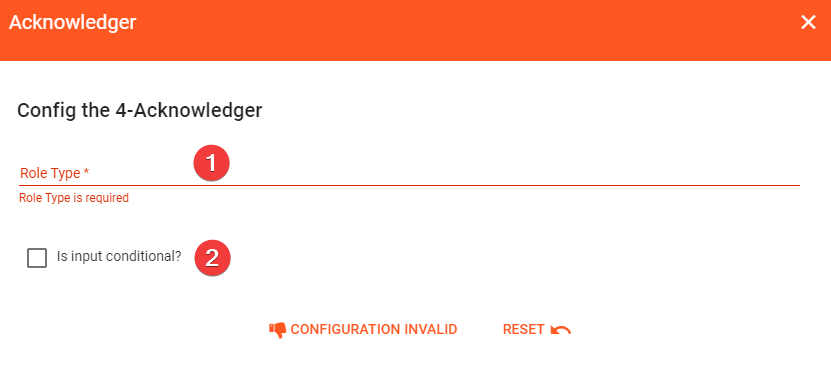
- Select "Role Type"
- Anyone in Biosensors
- This allows initiator to select own approver from user listing during process initiation.
- Specific role
- Process will be routed to specific role configured at Company,function,department and job title level for action.
- The role can be setup as :
- Company only
- Company + function only
- Company + function + department only
- Company + function + department + job title
- If there is more than one person found for the defined role , system will display the user list for selection (e.g. if role is setup as company only, list of users under the company will be shown for selection)
- Same User As
- Process will be routed to person same as in other user steps (user to specify).
- Requestor
- Requestor is either initiator or on-behalf user.
- Process will be routed to requestor.
- Group Email
- It provides flexibility to inform group users via group email without needed to setup multiple acknowledger that target different users.
- Check if acknowledger is conditional.
- Acknowledger is notified only when the defined criteria is matched.
- The configuration is similar as Field Conditional Rules. Refer "Configure field conditional rules" for details
Automator configuration
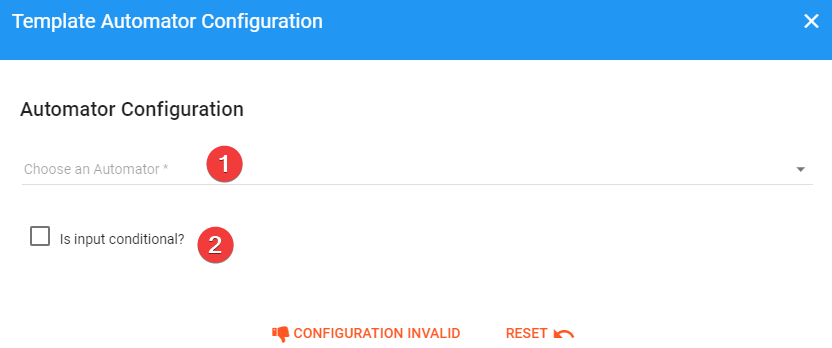
- Choose an Automator
- Define function that automated process without human intervention. (e.g. integration with other system for data exchange)
- Please seek IT assistance for configuration if required.
- Check if the automator is conditional
- Automator is triggered only when the defined criteria is matched.
- The configuration is similar as field conditional rules. Refer "Configure field conditional rules" for details.
User group configuration
- A user group can include multiple approvers or action takers
- All the approvers/action takers in the group will be pending action at same time once the process is routed to the user group
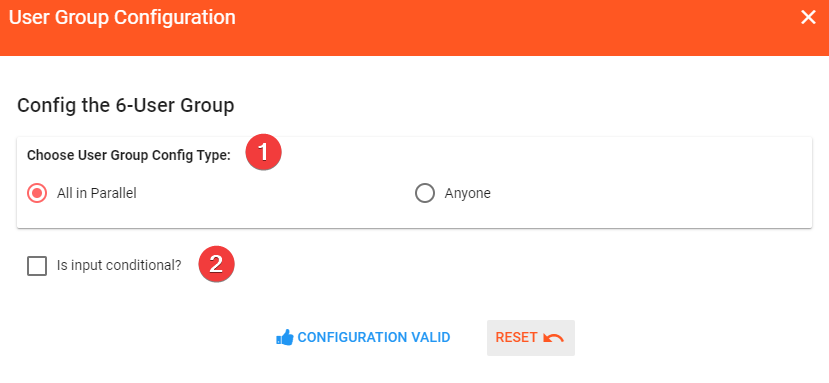
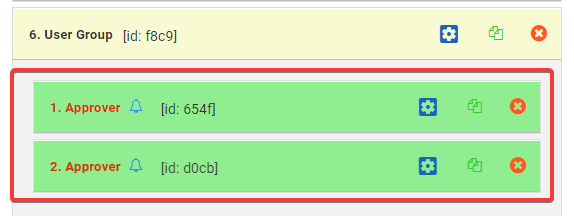
- Select "Choose User Group Config Type".
- All in Parallel - All users in the user group are required to complete the task in order for process to proceed to next step.
- Anyone - Only one of the user in user group is required to complete the task in order for process to proceed to next step.
- Check if the user group is conditional.
- The user group is routed for action only when the defined criteria is matched.
- The configuration is similar as Field Conditional Rules. Refer "Configure field conditional rules" for details.
Configure reminder
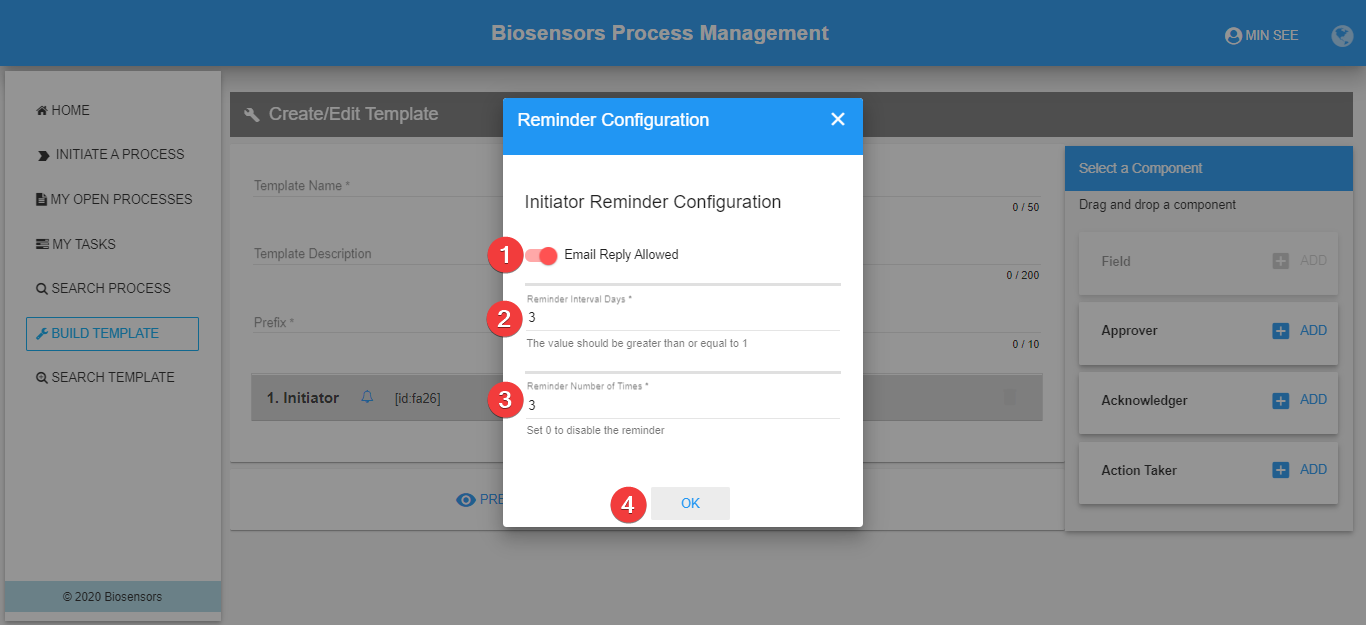
- Enable/Disable "Email Reply Allowed".
- When enable, system allows user to act on request by replying through email. If disabled, user has to act on the request through BPM system.
- Enter "Reminder Interval Days".
- Reminder will be sent based on the configured interval days.
- Enter "Reminder Number of Times".
- Reminder will stop sending email reminder to user once reaching the configured value.
Submit template for approval
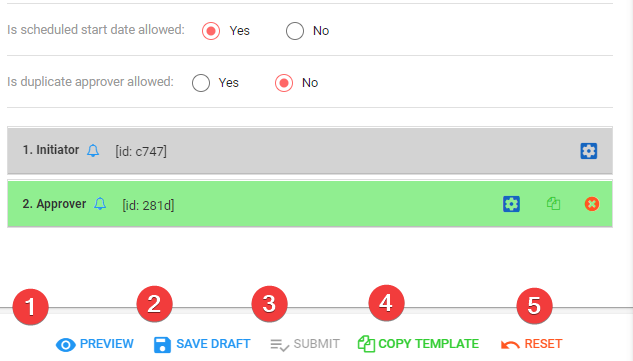
- Click on "Preview" button to review template before submission.
- You will be able see how the form is rendered to requestor and who will be routed to for action and approval.
- Click on "Save Draft" for later submission.
- This is pretty useful when process is complicated and take time to design.
- Click on "Submit" button to submit the template for approval.
- Button will be disabled if system detects there is missing mandatory information or invalid setting.
- Upon submission, template will first be routed to your local IT, follow by your functional head for review and approval.
- Template will be released and available to all users once approval given by both local IT and functional head.
- Click on "Copy Template" button to copy template into clipboard. Then you can paste the template in "New template from copy" feature.
- Please contact IT for assistance about the usage.
- Click on "Reset" button will erase current template configuration and start as new template.